介绍
WebSocket 协议 是基于 TCP 协议的全双工通信协议,是通过单个 TCP 连接在客户端和服务器之间建立全双工、双向通信通道,可让客户端与服务端建立持久连接,并实时互传数据。它与 HTTP 同为应用层协议,但相比于 HTTP 的请求 - 响应模型,WebSocket 则提供了实时、低延迟的数据传输能力和长连接功能,旨在解决 HTTP 协议在实时通信方面的局限性,如请求 - 响应模式的单向性以及频繁的连接、断开开销。WebSocket 的特性,使得其在即时通讯、游戏同步、IOT 设备实时监控等应用场景大放异彩,已成为现代 Web 应用中常用的通讯协议之一。
在 Spring Boot 中整合 WebSocket 方式有两种:
- 使用 Jakarta EE 规范提供的 API
- 使用 Spring 本身提供的模块依赖
本篇是 Spring Boot 整合 WebSocket 系列的第一篇,介绍第一种方式(若对 Spring WebSocket 模块感兴趣,可直跳 WebSocket 集成(二))。
题外话:Jakarta EE 前身是 Java EE,因为后者在 2017 年被 Oracle 公司捐赠给了 Eclipse Foundation,之后 2018 年 Eclipse 基金会便发布了 Jakarta EE 9,之所以改名,是因为「Java」这个名字的商标归 Oracle 所有,Eclipse 基金会无法继续使用
javax.*、java.*等名称,因此将其改为「Jakarta(雅加达)」,而 Spring Boot 从 3.x 开始便从 Java EE 切换到了 Jakarta EE。值得一提的是,Jakarta(雅加达)是 Java 岛(爪洼岛)上最大的城市,也是印度尼西亚的首都,而 Apache 软件基金会也有名为 Jakarta 的项目,但两者没有任何关系。
集成 Jakarta WebSocket
项目依赖
首先创建 Spring Boot 项目,笔者使用的版本:3.2.2,然后在pom.xml添加如下依赖:
<dependency>
    <groupId>org.springframework.boot</groupId>
    <artifactId>spring-boot-starter-websocket</artifactId>
</dependency>
端点
根据 Jakarta WebSocket 规范(见参考资料 1),服务器端点的创建有两种方式:一是实现规范所提供的接口,如Endpoint,并实现其相关方法来处理新连接建立、消息接收、连接断开等时间;二是通过注解,较为便捷与灵活。接下来的所有代码示例也是基于注解方式实现。
首先创建一个服务器端点,如下:
@ServerEndpoint(value = "/channel/call/{uid}")
public class CallChannel {

	private static final Logger LOGGER = LoggerFactory.getLogger(CallChannel.class);
    private Session session;
    // 存储客户端连接
    private static final Map<String, CallChannel> wsMap = new ConcurrentHashMap<>();

    @OnMessage(maxMessageSize = 1000)
    public void onMessage(String message, boolean last) throws IOException {
				// ID 是标识连接的唯一字符,每个连接仅此一个,Tomcat 下是从 0 递增,undertow 则为类似 UUID 的字符串
        LOGGER.info("收到来自客户端的消息:{} - {}", this.session.getId(), message);
        // 发送消息给客户端,此处使用异步发送
        this.session.getAsyncRemote().sendText(message);
        // 这个是同步发送,会阻塞至消息发送成功
        // RemoteEndpoint.Basic basicRemote = this.session.getBasicRemote();
        if (last) {
            // do something...
        }

        // 发送 bye 则关闭连接
        if ("bye".equalsIgnoreCase(message)) {
            this.session.close(new CloseReason(CloseReason.CloseCodes.NORMAL_CLOSURE, "Bye"))
        }
    }

    @OnOpen
    public void onOpen(Session session, @PathParam("uid") String uid, EndpointConfig endpointConfig) {
    		// 保存在实例变量中,Jakarta WS 每建立一个连接便会创建一个端点,因此该变量是线程安全的
        this.session = session;
        LOGGER.info("新的连接:id={}", this.session.getId());
				// session 可获取连接请求的查询参数,路径参数则需要在 WS 的端点路径上(@ServerEndpoint)配置
        Map<String, List<String>> requestParameterMap = session.getRequestParameterMap();
        LOGGER.info("获取到请求参数:{}", requestParameterMap);
        LOGGER.info("获取到路径参数:{}", uid);

        // 配置信息
        PojoMethodMapping mapping = (PojoMethodMapping) endpointConfig.getUserProperties().get("org.apache.tomcat.websocket.pojo.PojoEndpoint.methodMapping");
        LOGGER.info("[websocket] 连接路径:id={}, path={}", this.session.getId(), mapping.getWsPath());
    }

    @OnClose
    public void onClose(CloseReason reason) {
        LOGGER.info("连接断开:id={},reason={}", this.session.getId(), reason);
    }

    @OnError
    public void onError(Throwable throwable) throws IOException {
        LOGGER.info("连接异常:id={},throwable={}", this.session.getId(), throwable.getMessage());
        // 关闭连接。状态码为 UNEXPECTED_CONDITION(非预期异常)
        this.session.close(new CloseReason(CloseReason.CloseCodes.UNEXPECTED_CONDITION, throwable.getMessage()));
    }

    public int clientSize() {
        return wsMap.size();
    }
}
@ServerEndpoint注解用于声明此类是一个 WebSocket 端点,value 属性必填,其表明了 WebSocket 连接路由,注解还包括subprotocols、decoders、encoders等属性可以定义子协议、数据编解码器等。
@OnOpen
@OnOpen注解的方法会监听客户端的连接事件,方法参数一session必填,表示连接对象(其实所有方法都支持使用 session 作为参数)。而uid是通过端点路径配置的路径参数。想必大家也能意识到,通过端点路径是可以传递查询参数或路径参数的,如代码所示去获取参数即可。
每当有新的客户端连接接入时,服务器便会创建一个新的端点实例,所以 session 的获取是线程安全的,同时也可以在端点类中声明静态缓存(如代码示例中的wsMap),用于存储所有的客户端连接。
最后一个参数则为端点配置信息对象,可获取当前 WebSocket 端点的信息,通过 Debug 可得到其属性 Key 从而获取数据。
@OnClose
@OnClose注解的方法则用于监听连接的关闭,并且方法带有一个CloseReason对象,封装了连接关闭原因、状态码等。
@OnError
@OnError方法则用于处理异常事件,该方法必须要有一个Throwable对象来表示发生的异常,否则启动服务时会提示该方法缺少Throwable参数对象。根据异常可针对性的执行某些操作。也可在此对 session 进行关闭,关闭需要传递CloseReason对象,而CloseReason.CloseCodes也已定义了一些常见的枚举原因,可直接使用。
@OnMessage
@OnMessage方法自然是用来接收客户端消息,通过字符串类型的 message 接收,但 WebSocket 本身也是支持二进制消息的,参数类型可以是String、byte[]或Reader、InputStream。并且该注解还提供了属性maxMessageSize用于控制接收的消息大小,若超出则会断开连接,默认 -1 无限制。
参数二last用于判断获取到的消息是否为数据的最后一部分,当数据内容过大,WebSocket 会将其分割为多份传递。
配置端点扫描
定义好 WebSocket 端点后,需要创建ServerEndpointExporter对@ServerEndpoint注解的端点进行扫描注册。
@Configuration
public class WebSocketConfig implements ServletContextInitializer {

    /**
     * 创建 ServerEndpointExporter 实例,扫描 WS 端点,
     * ServerEndpointExporter 用于检测带有 @ServerEndpoint 注解的类,并为其注册一个 WebSocket 运行时
     * @return ServerEndpointExporter
     */
    @Bean
    public ServerEndpointExporter serverEndpointExporter() {
        // 显式注册应该在启动时注册的带注释的端点类型
        // exporter.setAnnotatedEndpointClasses(CallChannel.class);

        // 实际只需在端点类上加 @Component 注解,因为 exporter 会扫描带有 @ServerEndpoint 注解的 Bean
        // 详细可见 ServerEndpointExporter#afterSingletonsInstantiated 方法
        return new ServerEndpointExporter();
    }
}
JS 连接测试
在项目中的src/main/resources下创建public目录,并创建文件index.html,Spring Boot 默认将此作为应用主页,如下:
<!DOCTYPE html>
<html lang="">
<head>
    <meta charset="UTF-8">
    <title>WebSocket</title>
</head>
<body>
<script type="text/javascript">
    let websocket = new WebSocket("ws://localhost:8080/channel/call/9527");

    // 连接断开
    websocket.onclose = e => {
        console.log(`连接关闭: code=${e.code}, reason=${e.reason}`)
    }
    // 收到消息
    websocket.onmessage = e => {
        console.log(`收到消息:${e.data}`);
    }
    // 异常
    websocket.onerror = e => {
        console.log("连接异常")
        console.error(e)
    }
    // 连接打开
    websocket.onopen = e => {
        console.log("连接打开");

        // 创建连接后,往服务器连续写入 3 条消息
        websocket.send("这是第一条消息");
        websocket.send("这是第二条消息");
        websocket.send("这是第三条消息");

        // 最后发送 bye,由服务器断开连接
        websocket.send("bye");

        // 也可以由客户端主动断开
        // websocket.close();
    }
</script>
</body>
</html>
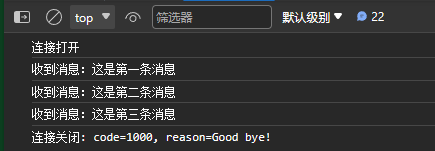
- 首先与服务端点建立 webSocket 连接:
ws://localhost:8080/channel/call/9527,9527是路径参数 - 连接接入后,在
onopen函数中打印日志并向服务端发送三条数据,最后发送bye给服务端关闭连接 - 连接关闭后,
onclose方法也能得到回调并输出日志 onmessage自然是接收服务端推送的内容,实际应用中也是在此处根据消息来执行业务逻辑
然后启动服务,在浏览器访问应用地址即可,记得打开浏览器控制台:


在端点中注入 Bean
在端点中注入 Spring Bean,并不能直接通过@Autowired等注解注入依赖,因为端点并非由 Spring 创建,而是由服务器(Spring Boot 默认是 Tomcat)创建。因此,在端点上添加@Component注解只是表示会由 Spring IOC 管理而已,所以可通过ApplicationContextAware接口得到ApplicationContext来获取 Bean。
@ServerEndpoint(value = "/channel/call/{uid}")
@Component
public class CallChannel implements ApplicationContextAware {

	private static ApplicationContext springContext;
	private UserService userService;  // 假设 UserService 是其它 Bean 依赖

    @Override
    public void setApplicationContext(ApplicationContext applicationContext) throws BeansException {
        springContext = applicationContext;
    }

    @OnOpen
    public void onOpen(Session session, @PathParam("uid") String uid, EndpointConfig endpointConfig){
        this.session = session;
        // 注入 Bean 对象
        this.userService = springContext.getBean(UserService.class);
    }

}
由于@OnOpen方法在整个连接的生命周期中,只会执行一次,所以该方式不会带来性能损耗。
关于 onMessage 方法的 last 参数
上方提到@OnMessage方法的last参数是 WebSocket 自动根据消息内容大小从而确定是否分割数据传递,若分为多份,那么没拿到最后一份数据时,last自然为false。其实这里正确来说,是否将数据分割,是根据 Tomcat 系统配置参数来决定的,即:org.apache.tomcat.websocket.DEFAULT_BUFFER_SIZE,默认8*1024字节。
Tomcat 服务器下的 WebSocket 在读取数据时,会用到三个Buffer,分别是:
ByteBuffer readBuffer:读缓冲区,用于读取传递的数据,作为中间缓冲区暂存数据,该区默认大小即为DEFAULT_BUFFER_SIZEByteBuffer messageBufferBinary:字节缓冲区,大小默认8*1024字节CharBuffer messageBufferText:文本缓冲区,大小默认8*1024字节
假设客户端此时发送了一条数据,那么会由messageBufferBinary接收,没错,WebSocket 默认将所有数据都用字节缓冲区接收,再根据@OnMessage方法的参数类型来决定是否转化为对应类型。而由字节缓冲区接收后,会利用readBuffer读取数据,从而判断数据是否超出了缓冲区大小,决定是否需要对数据进行切分。也就是说,若传递数据超过8*1024字节,那么当回调@OnMessage方法时,便能看到last参数为false,具体源码可以看:WsFrameBase.java类下的processDataText()与processDataBinary()方法。
至于上述三个缓冲区的大小设置方式,如下:
@SpringBootApplication
public class WsSummaryApplication {

    public static void main(String[] args) {
        // 设置 Tomcat 关于 WebSocket readBuffer 缓存区的大小,默认是 8*1024,单位:byte
        System.setProperty("org.apache.tomcat.websocket.DEFAULT_BUFFER_SIZE", "32");
        SpringApplication.run(WsSummaryApplication.class, args);
    }
}

@Configuration
public class WebSocketConfig implements ServletContextInitializer {
    @Override
    public void onStartup(ServletContext servletContext) throws ServletException {
        servletContext.addListener(WebAppRootListener.class);
        servletContext.setInitParameter("org.apache.tomcat.websocket.textBufferSize","1024");
        servletContext.setInitParameter("org.apache.tomcat.websocket.binaryBufferSize","1024");
    }
}
关于心跳
Jakarta WebSocket 关于 ping/pong 有对应的规范描述,不过在实际应用中,前后端可约定好ping发送的消息内容,这样服务端可通过@OnMessage来做对应的处理,并不麻烦。或者由服务端开启定时任务主动发送ping消息给客户端也是可以的。网上参考资料不少,在此就不多赘述。
后续
此篇内容大量借鉴于参考资料 2 的博客内容,因对 WebSocket 较有兴趣,便学习了一番,不过在查看了其博客站点,发现只是介绍了 Jakarta WebSocket 的整合方式,也没有深入讲解原理。因此笔者在此记录并做了补充,后续再补充 Spring 自身提供的 WebSocket 整合实现。
